Before you install
This tutorial walks you through preparing your network environment and physically connecting a CID before activation. It is intended for network IT administrators who configure the lab infrastructure.
The following steps must be completed before installing CIDs and connecting them to OpenLab CDS.
Prerequisites
Before you start, make sure you have the access, hardware, and background information required for this setup.
- You must have administrative access to your corporate network, firewall, DHCP, and DNS systems.
- You need the CID hardware and power cables.
- You must have reviewed the system requirements.
- (Optional) You need the Site Preparation Checklist that your Agilent project team provides during project kickoff. Use it alongside this tutorial to confirm your lab is ready.
Enable CID connectivity
Before a CID can activate and receive updates, it needs outbound internet access to specific Agilent and cloud service endpoints.
- Confirm that each CID has an internet connection for activation, security updates, monitoring, and other maintenance activities.
- Configure the network and firewalls to allow connections from the CIDs to the required internet sites (see the complete list in the Internet requirements section of System requirements).
- Review the SSL certificate requirements for HTTPS section of System requirements before you proceed.
Enable CID network readiness
When first connected, the CID automatically obtains its network settings using DHCP. After activation, you can assign a static network configuration. CDS clients must resolve CID hostnames to their IP addresses for proper operation.
- If your DHCP servers support dynamic DNS registration for Linux systems, confirm that the DHCP server registers the CID hostname automatically with the DNS server.
- Otherwise, register the desired CID hostnames in DHCP and DNS using the device MAC address (found on the QR code label).
- Verify that CDS clients can resolve the CID hostnames.
See the DHCP and DNS requirements section of System requirements for more detail.
Connect the CID to your network
With the network configured, you can now physically place and cable the CID.
- Plan the number and location of electrical outlets for your CIDs and instruments.
- Place the CID next to the instrument. Make sure that the device has proper ventilation during operation. Do not place CIDs on top of one another, in a sealed enclosure, or near heat sources.
- Connect the CID LAN ports:
- Corporate NIC. Connect this port to the corporate LAN for access to the OpenLab Server and the internet.
- Instrument NIC. Connect this port to the analytical instruments, either directly or through an instrument-dedicated LAN or VLAN.
- Connect the power cable and turn on the CID. On startup, the CID connects to CID Hub over the internet. If successful, it beeps 3 times every 30 seconds until you complete Add the CID to CID Hub. See Beep codes on startup for the meaning of other beep patterns.
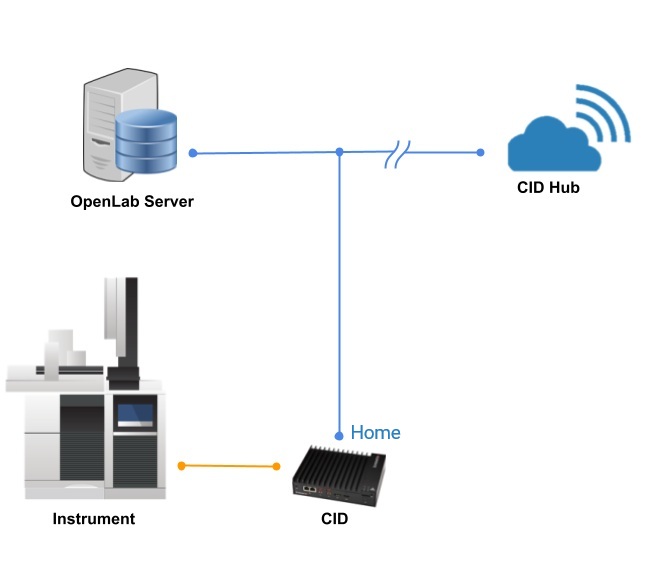
In this layout, CDS clients and CID Hub reach the CID through the Corporate NIC, while the instrument connects through the Instrument NIC.
Register and activate your CIDs
Your lab is now ready for CID activation. Continue to Register and activate CIDs.
For technical assistance, contact Agilent Technical Support.
See also
- System requirements: network, SSL, and DHCP/DNS requirements to confirm before installation.
- Configure network cards: set up the Corporate NIC and Instrument NIC on the CID.
- Register and activate CIDs: activate each CID and add it to CID Hub.
- Beep codes on startup: interpret the startup beep patterns.