Apply updates
All software on a CID, including the Linux host, the embedded Windows VM, the instrument drivers and add-ons, and OpenLab CDS, is updated through CID Hub. This page is for the lab administrator or IT operator who installs the changes after they have been selected (see Define a software template and Configure software exceptions).
Updates reach a CID in two phases:
- Download. When new versions are assigned to a CID, the CID downloads them in the background. No action is needed during this phase.
- Installation. Downloads do not install on their own. An administrator must start the installation from CID Hub. This lets you choose a convenient time, such as outside of production hours, so that ongoing work is not interrupted.
For procedures that walk through selecting a version before applying it, see the sibling pages:
Once an installation starts, do not power off or reboot the CID until Recent activity reports the operation as finished or restored. An interrupted installation may leave the component in a state that requires support to recover.
Prerequisites
Confirm these prerequisites before you apply updates.
- You must have an administrator role to apply updates.
- The CID must have Allow Changes on. (Bulk updates skip any CID with Allow Changes off.)
- The updates you want to install must already be downloaded. On the CIDs list, the Updates column shows Ready when a CID has changes ready to install.
Recommended CID state
Updates can be applied whenever changes are downloaded, but it is best to apply them when no instruments are running on the CID.
- Status. Ready means the CID is online, the OpenLab Instrument Service is running, and OpenLab CDS is not in use. Applying updates while the status is In Use is allowed, but acquisitions and ongoing analyses on that CID may be impacted.
- Updates. Ready means all selected changes are downloaded. Downloading means at least one component is still being fetched, and the install button is not yet active.
You can read what each column value means on the View CIDs page.
Installation order
When several components are applied together (through Apply Updates or Apply All Updates), CID Hub installs them in a fixed order:
- Linux update
- OpenLab CDS
- Windows update
- Mandatory drivers
- Optional drivers (in the order shown on the Software tab)
This order is enforced so that each step has its prerequisites in place. Drivers, for example, can only install after the CDS version they target is present.
Apply updates to several CIDs at once
Use this method to update a group of CIDs from the main list.
-
In CID Hub, click CIDs in the top navigation bar.
-
Use the Status and Updates column filters to narrow the list to CIDs that are Ready in both columns.
-
Select the checkbox for each CID you want to update.
-
Click Apply Updates in the toolbar above the table.

-
Confirm the action.
Each selected CID begins installing its pending changes. Progress is shown in the Updates column and, for each CID, in the Recent activity section of its Summary page.
CIDs with Allow Changes off, with no pending changes, or that are disconnected are skipped. The list of skipped CIDs is shown in the result message.
Apply all pending updates to one CID
Use this method when you want to update one specific CID, without affecting others. All pending changes for that CID are installed in one action.
-
On the CIDs list, click the CID name.
The CID detail page opens.
-
Select the Software tab.
-
Click Apply All Updates.

The CID installs every pending component in the installation order. The status of each component updates live in the Status column.
Apply a single update to one CID
Use this method when you want to install one specific component on a specific CID, for example to stagger a large update or to retry a single failed item.
-
On the CIDs list, click the CID name.
The CID detail page opens.
-
Select the Software tab.
-
Find the row for the component you want to install. The Status column shows where the component is in its lifecycle (for example, Downloading, Ready to install, Installing).
-
Click Install on that row.
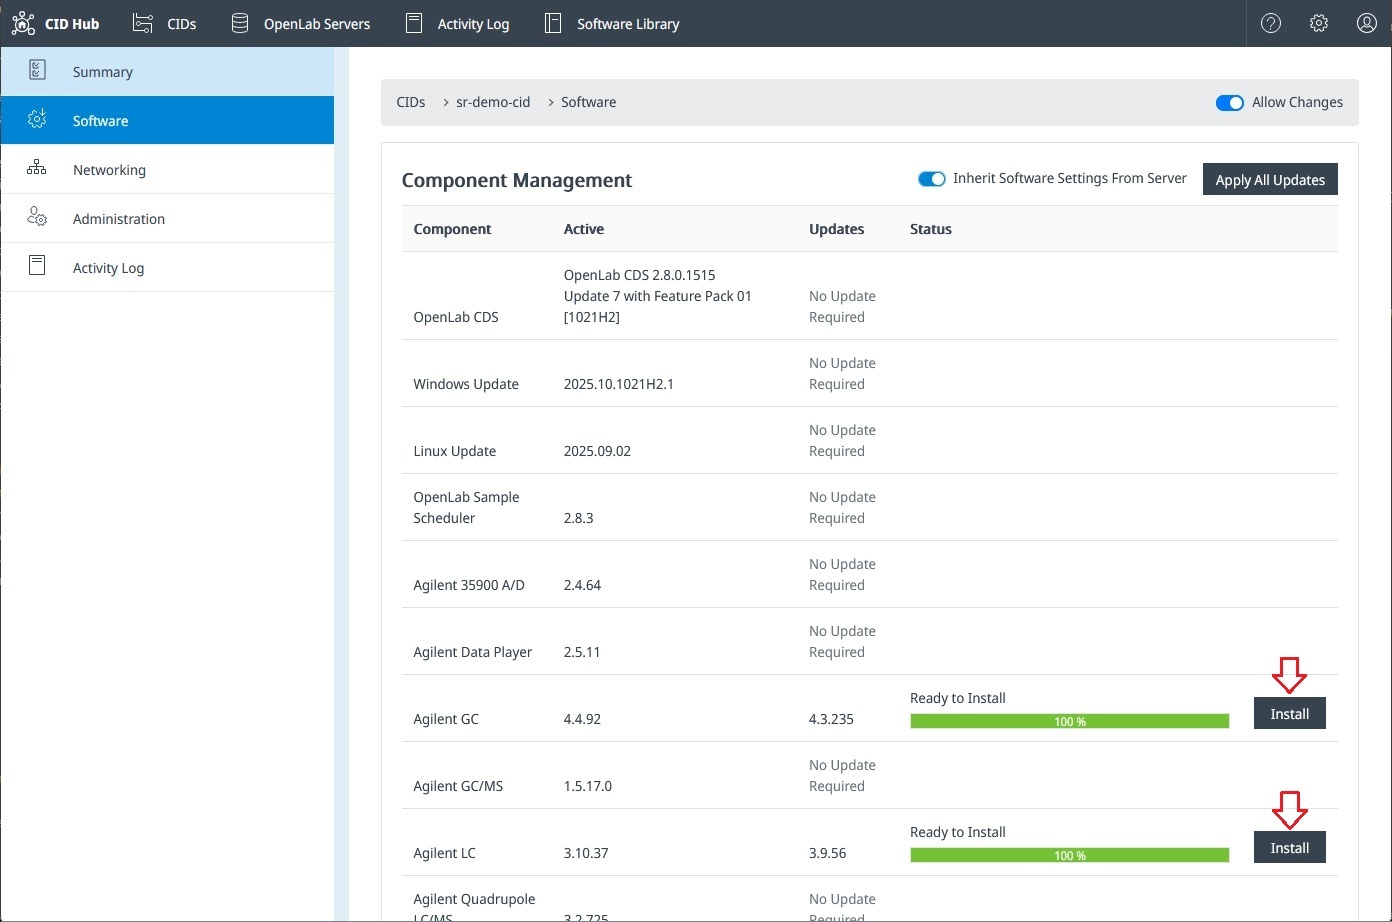
The component installs by itself. Other pending components stay queued and are not affected.
What happens on failure
If something goes wrong during installation, the CID is designed to stay usable. Components that already installed successfully in the same run keep working, and the Recent Activity section on the CID's Summary page plus the Activity Log record both the failure and any recovery action.
How the failed component itself is handled depends on what it is:
- OpenLab CDS, Linux update, and CID Connectivity. These components are protected by a two-slot update mechanism. If the new version cannot start, the CID automatically restores the previous version from the inactive slot and continues running.
- Windows updates. CID retries these updates up to 5 times at 60-second intervals inside the Windows VM. If all retries fail, the update is marked failed and the CID keeps running on its current Windows patch level.
- Drivers and add-ons. If one of these components fails to install, the existing driver stays in place. The failed install is reported on the Software tab and in the Activity Log.
To recover:
- Review the failure message in Recent activity and the matching entries in the Activity Log.
- Address the cause (for example, free disk space, restore network connectivity, or pick a compatible version).
- Reapply the update using one of these methods: Apply updates to several CIDs at once, Apply all pending updates to one CID, or Apply a single update to one CID. You only need to retry the components that failed.
- If reapplying the update does not recover the CID, or if a CDS restore cannot complete, run Reset OpenLab CDS from the CID administration page. This installs a fresh CDS VM from the baseline. Use this recovery option only after the other steps fail. Contact Agilent support if the reset does not return the CID to Ready.
See also
See these related pages for choosing versions, checking readiness, and recovering from failures.
- View CIDs: check Status, Updates, and Allow Changes before starting a bulk update.
- View activity logs: review the history of update installs and any automatic restores.
- CID administration: toggle Allow Changes or run Reset OpenLab CDS when recovery is needed.